Google doesn’t offer users any official way to try Chrome OS, but that doesn’t stop the developer from making that thing happen. The method discussed in upcoming lines will make it possible for the users to run Chrome OS on a computer or laptop running Windows, macOS, or Linux. The good thing is that you won’t be overwriting the present OS. If you’re are interested, then here’s what you need to do:
Running Chrome OS From a USB Drive
In upcoming lines, we will create a Chrome OS bootable USB Drive that has Chromium OS disk image. But to get started, you require a few things which are as follow:
A working computer or laptop that has a USB portA USB Drive with minimum 4GB StorageDownload: File archiving tool – 7-Zip for Windows (Free) | Keka for macOS (Free) | p7zip for Linux (Free)
Note: You can use your favorite tool for same purpose, we’re just suggesting you to above one’s
Download: Etcher, a tool that let you flash OS images to SD cards & USB drives, safely and easily. Download it for Windows | macOS | Linux (Free)
Note: During the installation process all the data in the USB Drive will be deleted. In case, you have important data in the USB Drive, save it somewhere else before starting following the instructions.
- Download the Latest Chromium OS image Google only provides Chromium OS build for Chromebook, and due to this reason, we’re going to use the alternate source, i.e., Arnold The Bat to download Chromium OS. You can this link to download the latest Chromium OS daily.
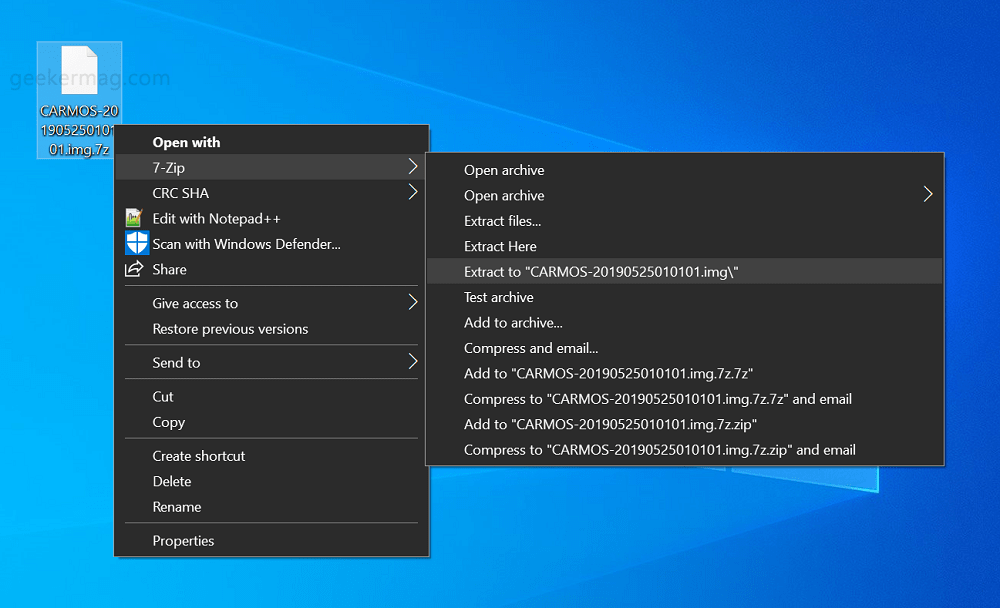
- Extract the Chromium OS Zipped Image Now you will have the Chromium OS Zipped image on your computer. Using the 7-Zip program, the one about which we shared in the download section.
- Format USB Drive Next, you need to format the USB Drive. For that, you need to inject USB Drive in the USB port and format it as FAT32. Windows, Mac, and Linux all three operating systems have different steps to format the USB Drive. You can search on YouTube to find the right steps for your OS. On a Windows-based computer or laptop, you need to right-click on the USB Drive and then select Format. A quick Format window will open up. Here, you need to change the File system from NTFS to FAT32 and then click on the Start button. Once the formatting process completes, you will get a notification. You can rename it to Chrome OS if you want. In case, you find it difficult to format USB Drive on your system, then you can use the following program to make the USB formatting easy.
For Windows and MacOS: SD Card Formatter for Windows For Linux users, GParted for Linux (Free)
- Launch Etcher and Install Chromium OS Image At this point, you have successfully formatted the USB Drive and named it Chrome OS. Right? Next, you have to install the Chrome OS Image file on your USB Drive. For that, you need to use Etcher. The tool about which we have already discussed in the download section. Here’s what you need to do: Once the installation of the Chrome OS image on the USB drive is completed, the Etcher will validate that everything is done write. Note: It is highly recommended to wait until it says 100%. Once the process completes, you will get the Chrome OS bootable USB drive.
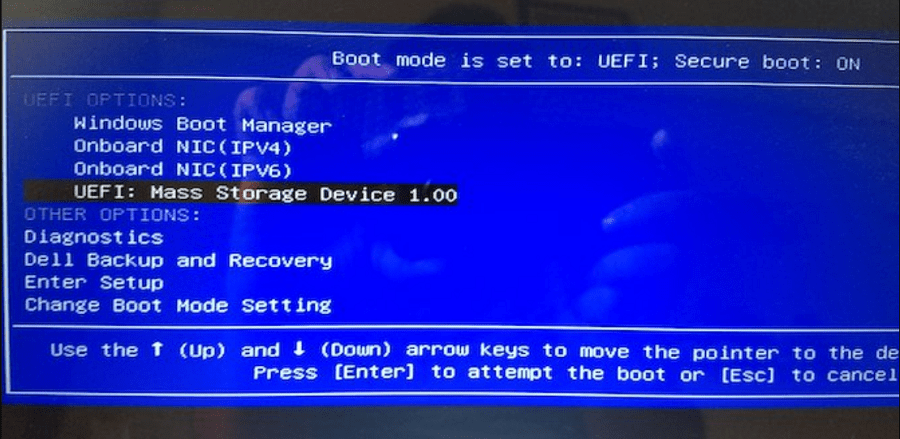
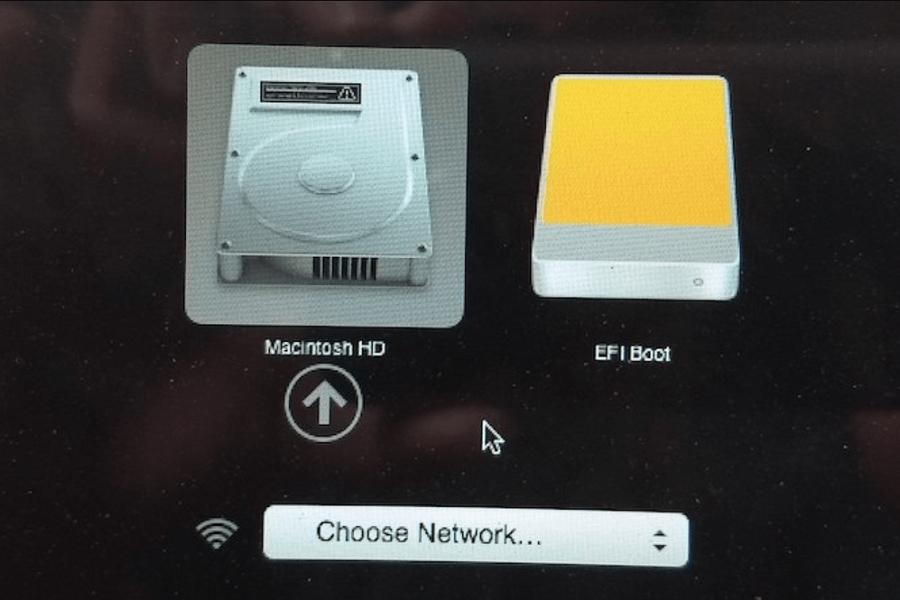
- Restart your computer and enter boot options Each operating system provides an option to select from which drive you want to boot the OS. Whether it is a Hard Disk, DVD Drive, and USB Drive. For this tutorial, you need to enter the boot options on your machine and select the bootable Chrome os USB drive which you have created right now. For Windows and Linux PCs – Every system offers unique BIOS Settings. Usually, to enter boot options, you can press the keyboard shortcut F5, F8, or F12 while rebooting your machine. For MacOS – When you restart your Mac, you need to press and hold the Option key. Keep holding the same key until the boot menu appear. Here, you can select USB Drive (Denoted as EFI).
- Boot into Chrome OS Now when you select the bootable Chrome OS USB drive in the boot options screen and hit enter. Your computer or laptop will load from USB Drive. You can now enjoy all the feature which Google offers in Chromebook on your computer, without affecting your operating system and primary hard drive. Since you’re using the Chrome OS for the first time, you need to set it up using Google account. This is a one-time process, and in the future, you will be directly taken to log in screen. If you really want to try Chrome OS without purchasing the Chromebook, then, you must give a try to this tutorial.