Enable and Use Stage Manager in macOS 13 Ventura on Mac: Detailed Guide
Just like any brand-new feature, Stage Manager may also take some time to get into your groove. However, once you have mastered this productivity-defining tool, you will love every bit of it. That’s for sure!
Enable/Disable Stage Manager on Mac
You can activate Stage Manager right from the Control Center on your Mac.
Simply click on the Control Center icon at the upper right corner of the screen and then click on the Stage Manager icon to turn it on.
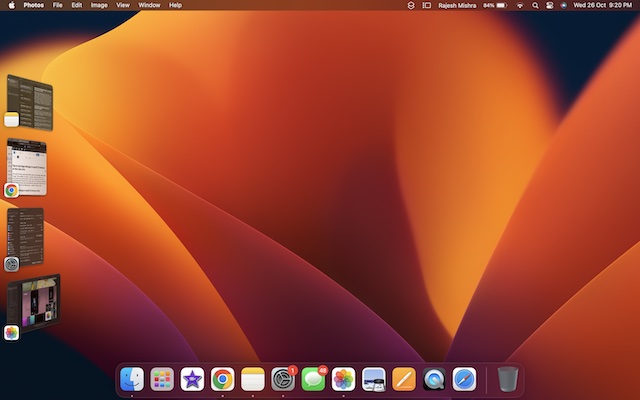
Now, the open app windows will start showing on the left side of the screen, thereby making it easier for you to switch between them.
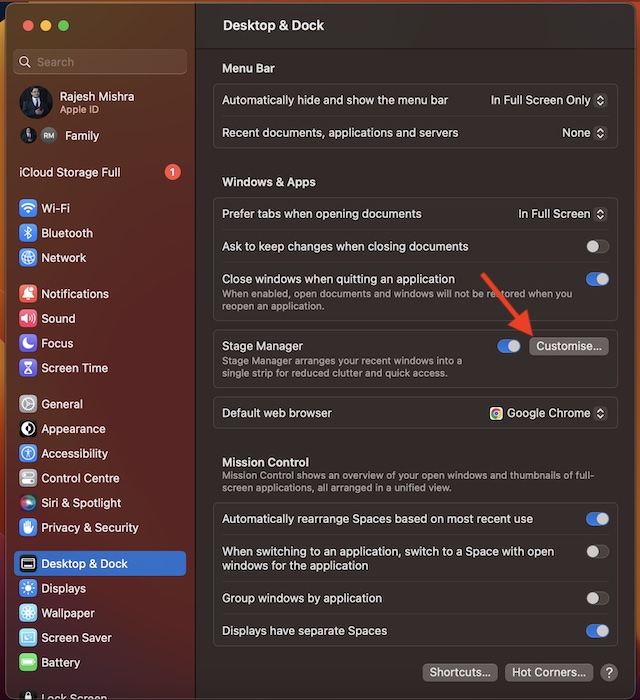
Later, if you ever want to disable it, click on the Control Center and hit the Stage Manager icon to turn it off. It’s worth pointing out that you can also turn on/off Stage Manager from the System Settings app. To get it done, head over to the System Settings app -> Desktop & Dock -> go to the Stage Manager section and then turn on/off the toggle as per your needs.
Switch Between Windows in Stage Manager on Mac
Note that when the Stage Manager is active, the app that you are currently using appears in the center of the screen. And other apps that you’re using show as thumbnails on the side.
You can easily switch between windows when Stage Manage is turned on. To get it done, just click on a thumbnail. It’s worth pointing out that thumbnails are arranged automatically depending on recent use. It shows up to six thumbnails based on the size of your desktop. It’s also important to note that each thumbnail shows a live view of its window, thereby making it more convenient for you to see updates like incoming messages without having to switch to that window.
Quickly Move or Resize Center Window on Mac
You can easily move or resize the Center Window in Stage Manager.
To do so, just drag its title bar or drag an edge of the window in order to expand that side of the window. Just in case a window covers thumbnails, the thumbnails will hide until you either uncover or move the pointer to the left edge of the screen.
Create a Window Group in Stage Manager on Mac
To create a window group, drag a thumbnail to the center window, or press the Shift key while clicking the thumbnail. To remove a window from a group, drag it back to the thumbnail area. To drag items to another window, you need to hold the item over a thumbnail until its window moves to the center. After that, drop the item into the window.If multiple windows are in the center, simply hold the item over a rear window until it moves to the front. Then after, drop the item.
Hide an App’s Thumbnail and Windows in Stage Manager
It’s incredibly simple to hide an app’s thumbnail and windows, just press Command-H.
How to Hide/Show Desktop Items When Stage Manager is Enabled
When you invoke Stage Manager, the desktop items get hidden so that you can fully concentrate on your needs. However, you can show or hide them without any hassle.
Temporarily Hide/Show Desktop Items When Stage Manager is Enabled on Mac
If you want to temporarily hide/show the desktop items when the Stage Manager is enabled on your Mac, just click on the screen.
Permanently Show Desktop Items When the Stage Manager is Enabled on Your Mac
There is also a pretty easy way to permanently show the desktop items when the Stage Manager is active on your Mac.
Go to the System Settings app -> Desktop & Dock -> Ensure that the switch next to Stage Manager is turned on. After that, click on Customize.
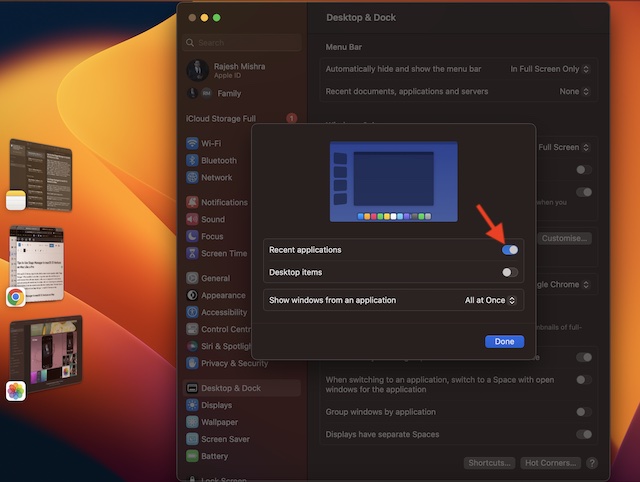
Then turn on the switch for Desktop Items and make sure to confirm the action by clicking on Done.
Show Recent Applications in Stage Manager on Mac
By default, thumbnails are hidden until you move your pointer to the left edge of the screen in Stage Manager. However, you can choose to keep thumbnails visible in the Stage Manager unless covered by a window.
Navigate to the System Settings app -> Desktop & Dock -> Customise -> then turn on the switch for Recent applications.
Control How Many Windows Show From an Application in Stage Manager on Mac
Stage Manager shows all windows from an application. Though you can restrict it to display only one window at a time.
Head over to the System Settings app –> Desktop & Dock -> Customise -> click on the drop-down menu next to All at Once and choose Only one at a Time.
Tips to Get the Most Out of Stage Manager on Mac
That’s pretty much it! So, that’s how you can enable and use Stage Manager like a pro on your Mac. Again, it may require a bit more time to sneak into your workflow. However, as soon as you have gotten a good hang of how it works, you will find it a great asset. That said, share your thoughts about Stage Manager and whether or not it has been able to impress you. Read more:
2 Ways to Convert Images into PDF in macOS 13 Ventura on MacHow to Remove Background from Photos in macOS 13 Ventura