The first build of Windows 11 is already available for early adopters and interested users have started installing it on their supported devices. You can our detailed post on How to install Windows 11. During installation, if you get an error message that says This PC Can’t Run Windows 11, then you can click the link to bypass this.
How to Install Windows 11 on Mac using Boot Camp
If you made upto this blog post, then it is highly possible that want to try the refreshingly new Windows 11 OS, but you have a Mac desktop or laptop, right? Fortunately, it is possible to install Windows 11 on Mac and in this blog post, we will share step by step instructions on how to do that: Thing to keep in mind: We would like to tell you have the following workaround is meant for the users who own device with Intel Processor running Mac OS. Don’t try this workaround on devices with Apple’s M1 chip. What you’ll require
A device with Intel Powered ChipLatest and official ISO image of Windows 10 (Learn how to do that)Latest ISO image of Windows 11 (Insider Preview) ISO Manager like AnytoISO. Grabt it from here
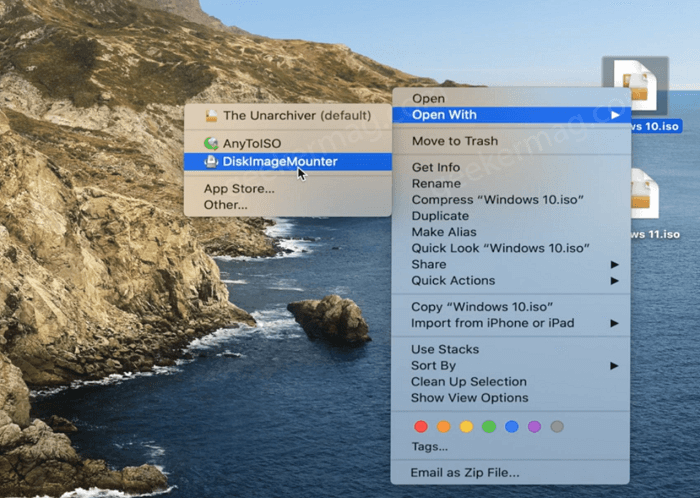
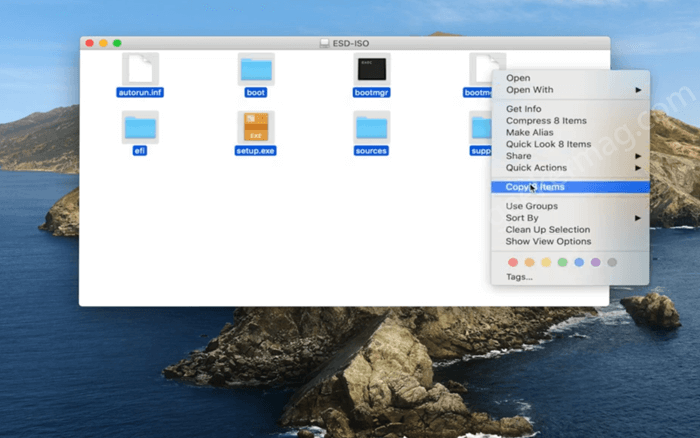
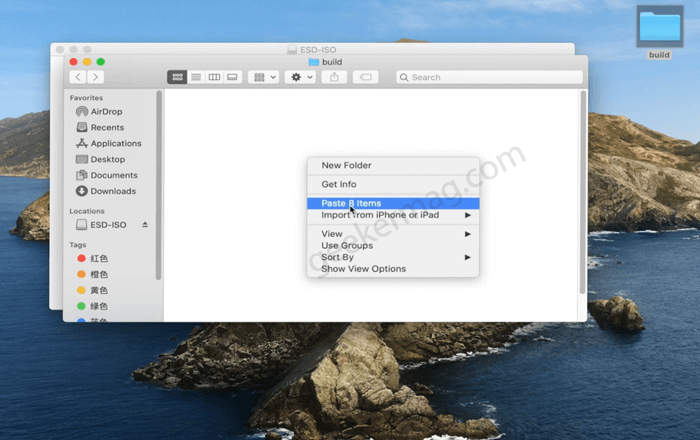
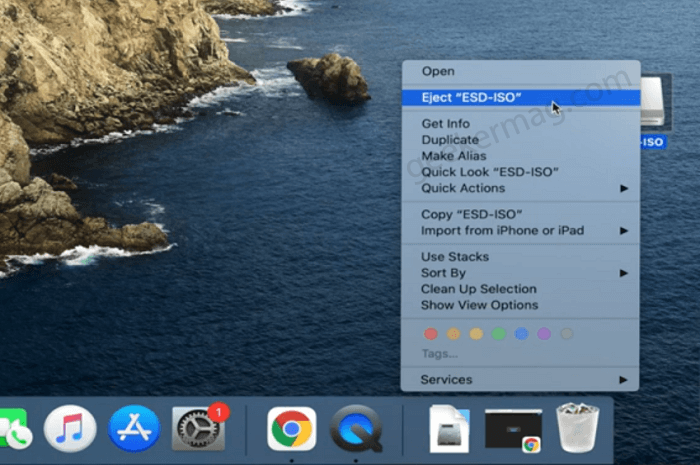
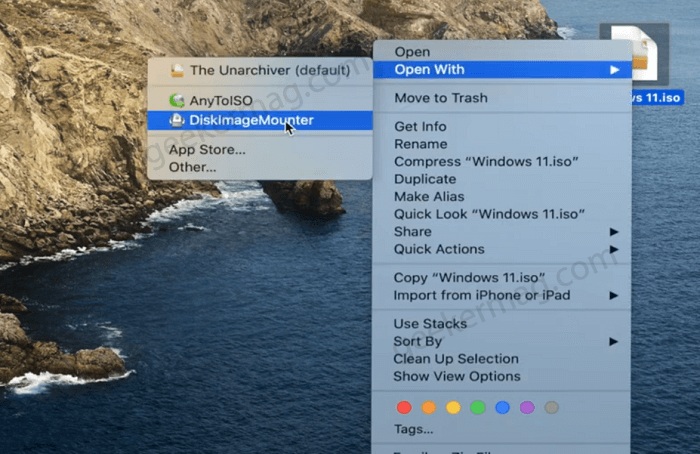
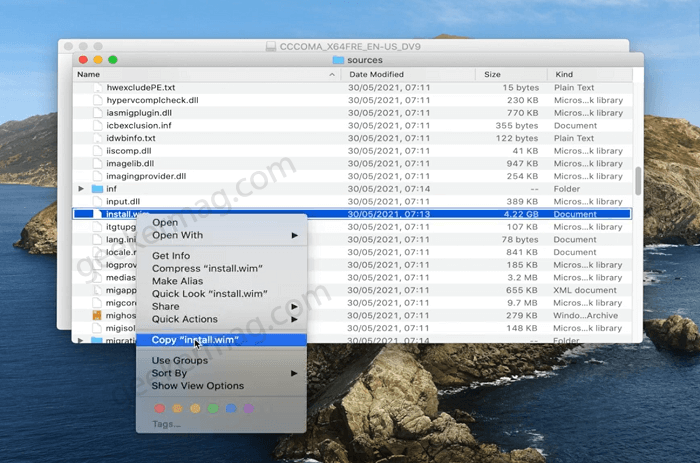
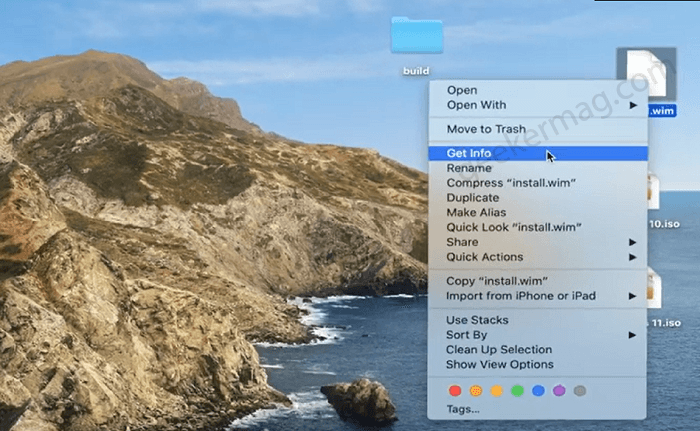
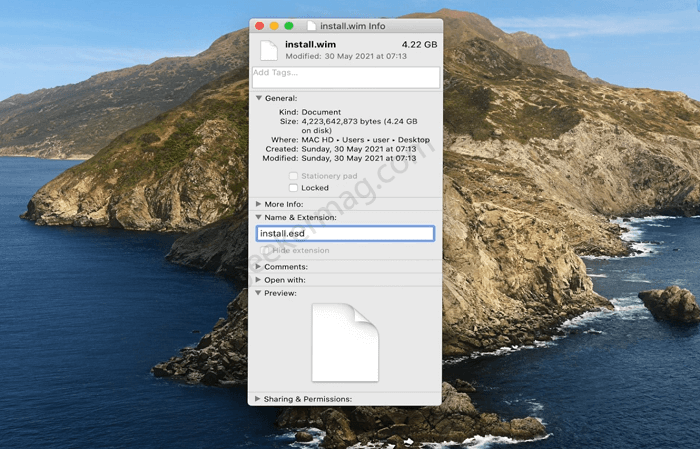
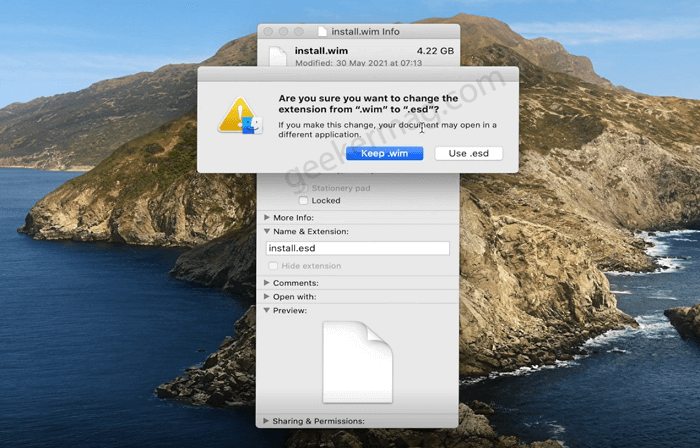
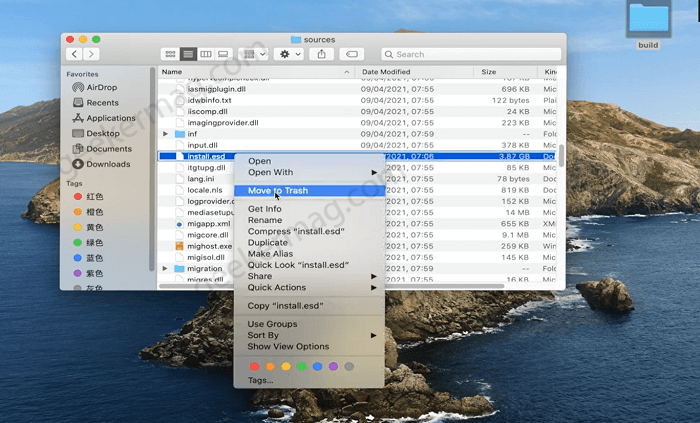
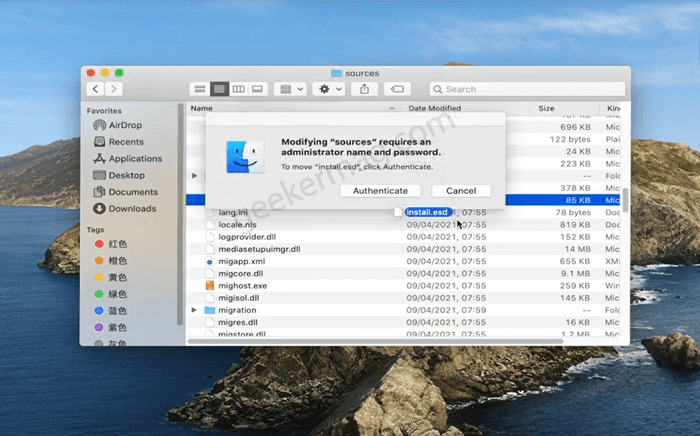
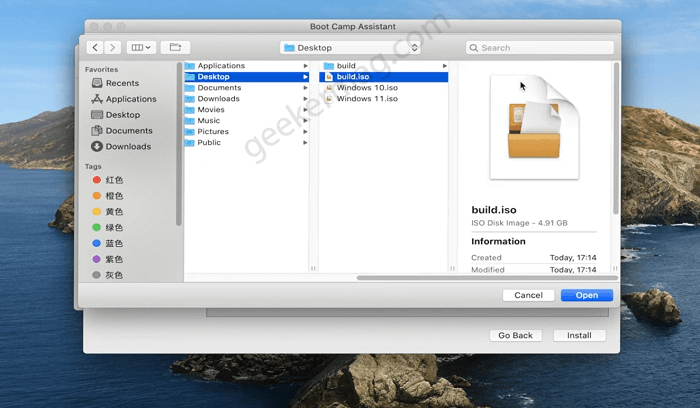
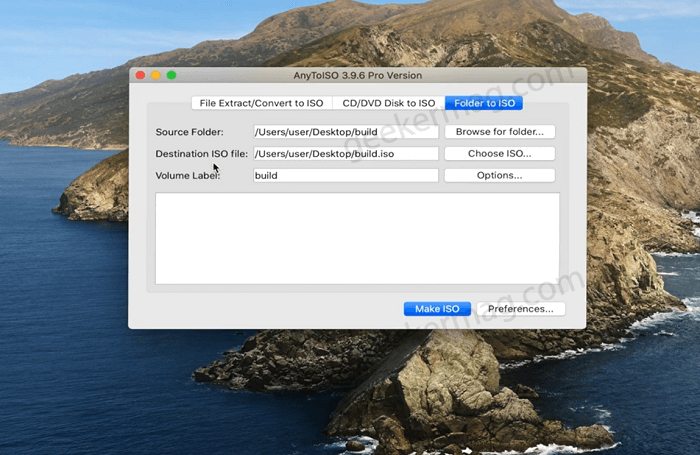
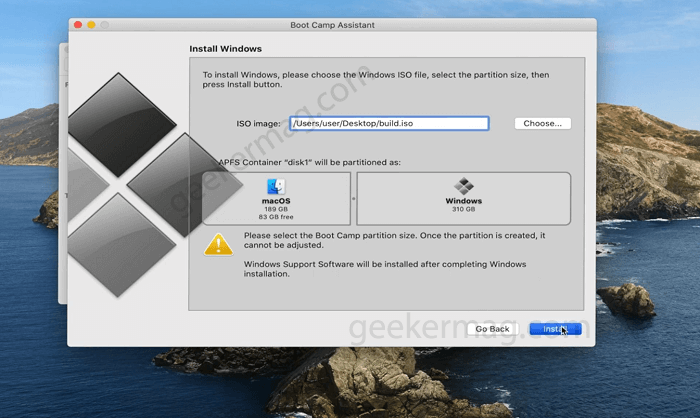
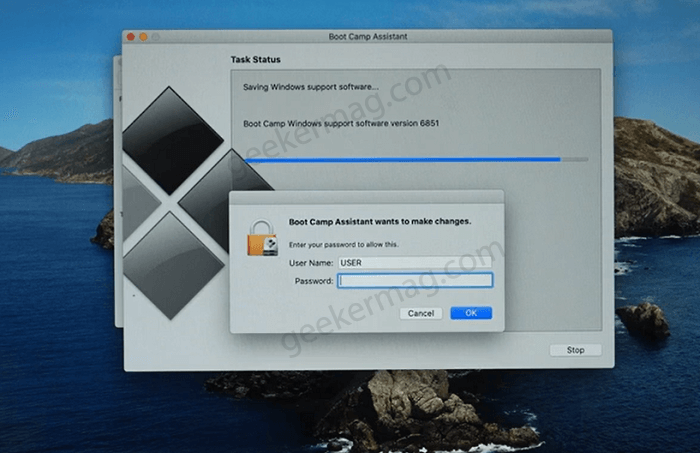
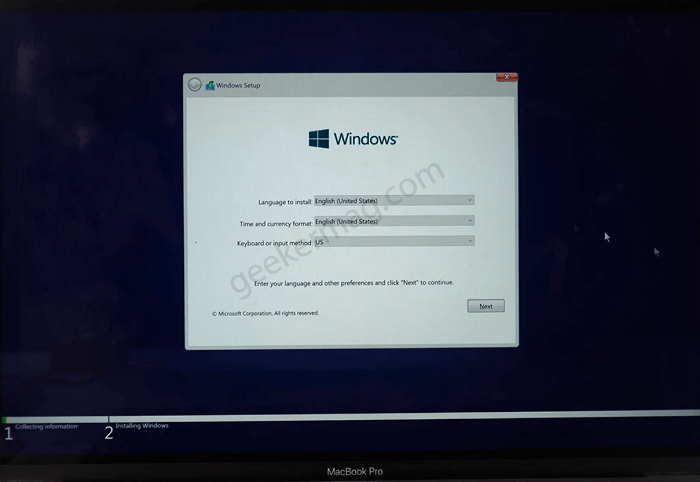
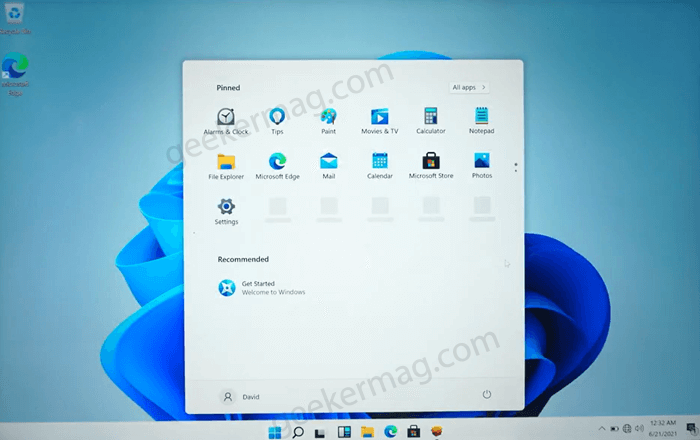
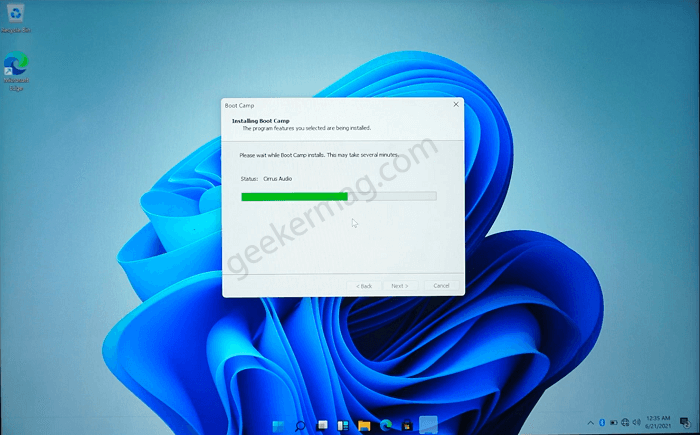
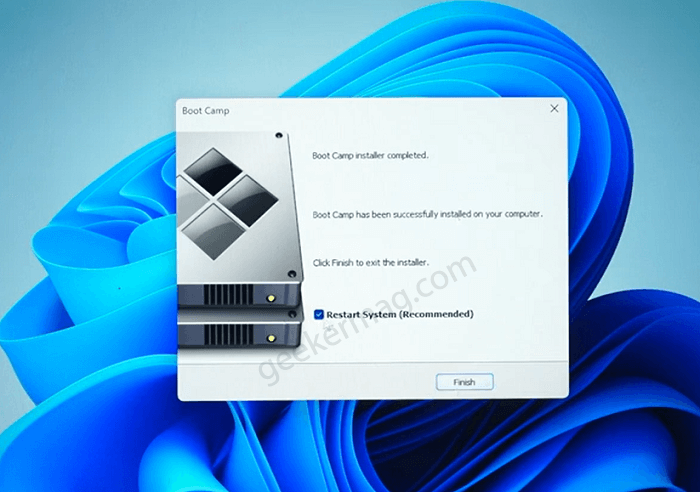
If you made upto this line, then we can assume that you have all the things that are required to complete the installation of Windows 11 on Mac, right? First of all, you need to mount Windows 10 ISO image. For that, Right-click on the Windows 10 ISO Image, select Open with > Disk ImageMounter. Doing this will open the window showing you all the files available in the ISO image. Select all file, right-click and then select “Copy 8 items“. Create a new folder on the desktop. For that, right-click and select New Folder. You name it Build or anything according to your choice. Open the new folder, right-click and select Paste 8 items. Now unmount the Windows 10 ISO image. For that, right-click and select Eject. Following the step one, you need to mount ISO image of Windows 11. Right-click > Open With > Disk ImageMounter. The window containing all the files and folder of ISO image will appear. Open Source folder and look for a file with name Install.wim. Once you find it, right-click, select Copy Install.wim from the menu, and then temporarily paste it on the desktop. Right-click on the Install.wim file on the desktop, then select Get info. In the Get info window, you need to head over to Name & Extension. Here, you need to find Install.wim. You need to edit and rename it to Install.esd. Once done, hit enter. A warning dialog box will appear, click Use .esd. After that, close the Get info window. Doing this will change Install.wim file to Install.esd. Next, you need to open Build folder that we have created above. Open the Sources folder, look for Install.esd file. Once you find it, right-click and select Move to Trash. To achieve this, you will be asked for a user account password, enter it to complete the process. After that, you need to copy-paste the install.esd file (the one that we renamed from install.wim to install.esd) from Windows 11 and paste it to Build folder. When a dialog box appear, click Authenticate and then again enter the account password to confirm the action. At this point, you have successfully created a Windows 11 files that are required to complete the installation of Windows 11. Open ISO Make app i.e. AnytoISO and in the tool switch to Folder to ISO. Click on the Browse for folder button and select the Build folder available on the desktop, click Open. Now, click on the Make ISO button. Wait for few seconds so that AnytoISO can create an ISO image of Windows 11. When ISO is done, this is how it looks like: Next, you need to click on the Go > Utilities. From Utilities folder, you need to launch Boot Camp Assistant. In the Boot Camp Assistant window, click on Continue button. Here, you need to select Boot Camp partition size. You need 64 GB or larger storage device. After that, click on Choose button next to the ISO image option and select the ISO image of Windows 11 that we have created using AnytoISO above, click Open. Next, click on Install button. Now Boot Camp Assistant will connect to an internet connection and start downloading all the files, apps, and drivers required for the proper functioning of Windows 11. You will be asked to enter the password. Now your device will reboot and start the installation of Windows 11 on your Mac. During the installation, you will see following screen: Setup screen where you need to enter language, time and currency, and Keyboard or input method, click Next. Product key screen, where you need to enter the product key or skip it for later, click Next. Select edition of Windows 11 that you would like to install on your Mac, click Next. Accept terms and conditions, click Next. Windows 11 installation screen will appear. Here, you need to wait for installation to complete. Once done, system will reboot. Next, you need will see the new OOBE screen of Windows 11. Again enter the details depending on your requirements. Select, Region and then click Yes. Select Internet connection to continue the setup and then click Next button. Now, you need to fill in some privacy settings. You can manage them later. Once Windows 11 setup is done on your device, you will see the Windows 11 Homescreen. After that, you need to open Boot Camp Assistant from background and then click Next, Here, select that you Accept the license agreement and then click Install button. Doing this will start installing all the important files, apps, and drivers require for properly working of Windows 11 in Mac. Once done, you need to check the box for “Restart System (recommended)” and then Finish. Your device will reboot and this completes the installation of Windows 11 on Mac Congratulation, you’re now running Windows 11 on your Mac. Why don’t you give it a try and let us know your opinion in the comments? You might be interested in reading:
How to Install Apple Music Android app on Windows 11How to Restore Windows 10 (Classic) Start Menu in Windows 11How to Get New Microsoft Store in Windows 11How to Use | Restore Windows 10 File Explorer in Windows 11How to Move & Align Taskbar Icons to the Left in Windows 11