How to Convert Freeform Document into PDF on Mac
Due mainly to the wide compatibility, PDF is widely used as the preferred file format. Notably, unlike other text files that often lose their formatting information on a different device or computer, PDF is able to retain all the information including style and image information from the source file. Regardless of which device you open PDF files, they always display correctly. On top of all, you also get the option to safeguard your files through a password.
- To get started, launch the Freefrom app on your Mac. Note:
It’s worth pointing out that the Freeform app has arrived in macOS Ventura 13.1 which is in beta. So, if you want to test this app, you will need to have the latest macOS 13 beta. If you are not running the macOS beta, you will need to wait until Apple publicly releases the macOS Ventura 13.1.
- Now, open the file that you would like to convert into PDF.
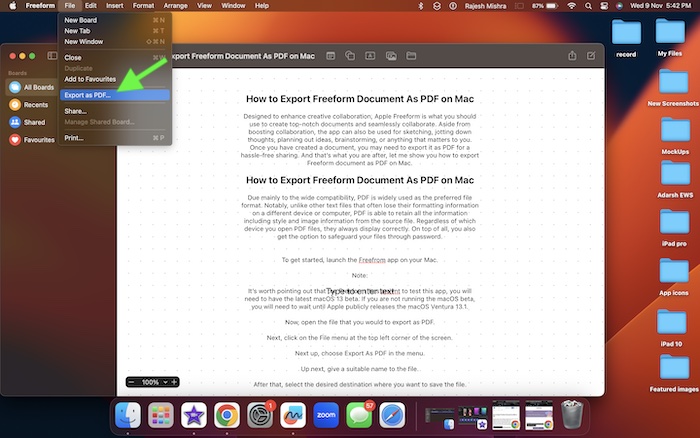
- Next, click on the File menu at the top left corner of the screen.
- Next up, choose Export as PDF in the menu.
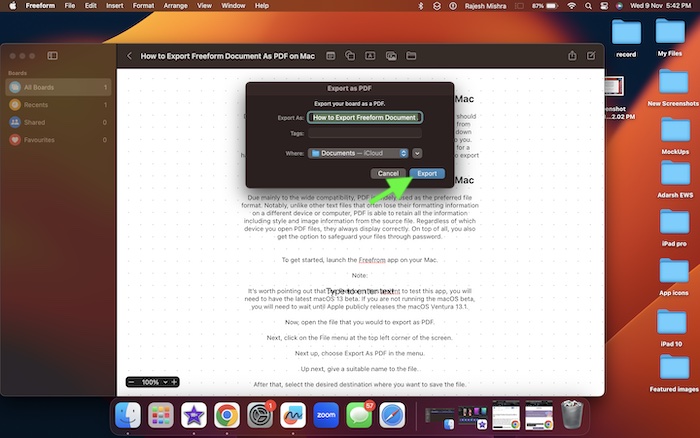
- Up next, give a suitable name to the file.
- After that, select the desired destination where you want to save the file.
- Finally, hit Export in the menu and you are good to go! So, that’s how you can convert a Freeform document into a PDF format. You can repeat the same steps to convert other files into PDFs.
Wrapping Up…
Even though the Freefrom app is still in beta, it seems to be running pretty well. Thanks to the intuitive user interface and easy-to-use features, it has felt familiar to me right from the word go. As I’m taking on this app for a long spin, I will keep sharing my thoughts about it. So, stay tuned in to ensure you don’t miss out on any updates. You may also like to catch up with:
How to Increase Mouse Pointer Size in macOS 13 Ventura on Mac How to Enable and Use Stage Manager in macOS 13 Ventura on Mac Like a Pro How to Remove Background from Photos in macOS 13 Ventura

