It might take 10-15% of your drive storage if you have enabled automatic system restore points. When running out of storage, you can delete system restore points in Windows 11 to make some room on your drive. You can delete all the restore points at once or set a max disk usage for system restore points. This article explains the step-by-step process to delete system restore points in Windows 11 below. Also Read: How to Fix the Windows 0x0 Error
Delete System Restore Points in Windows 11
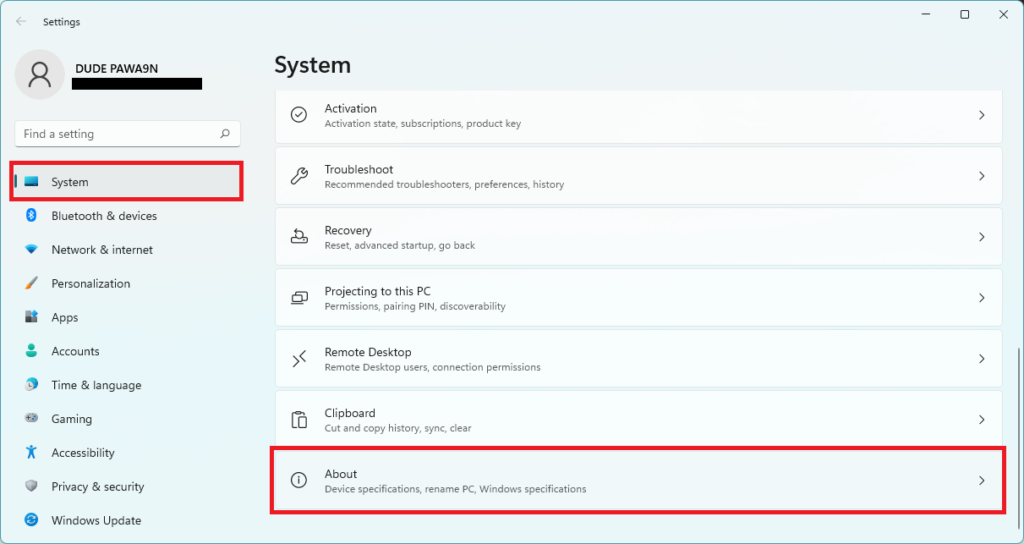
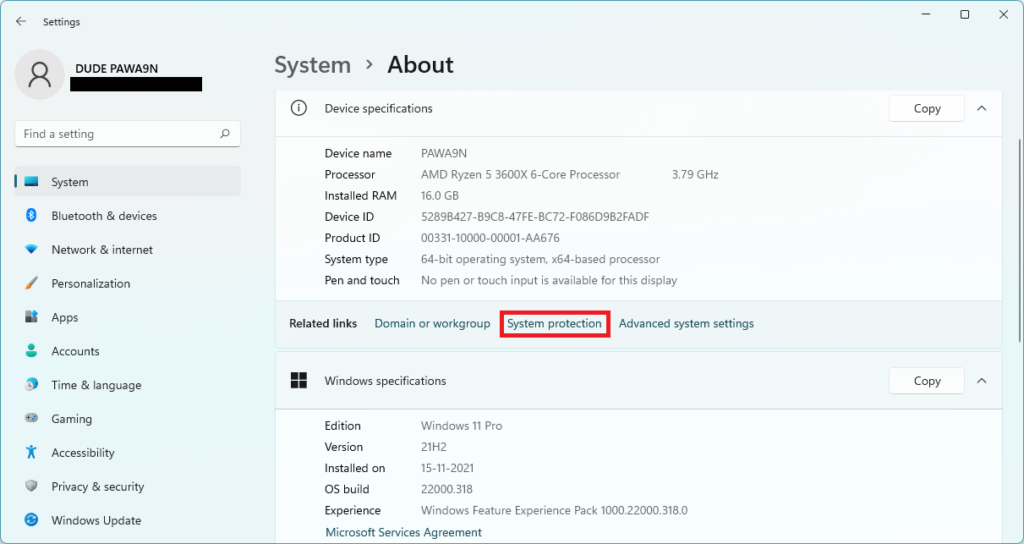
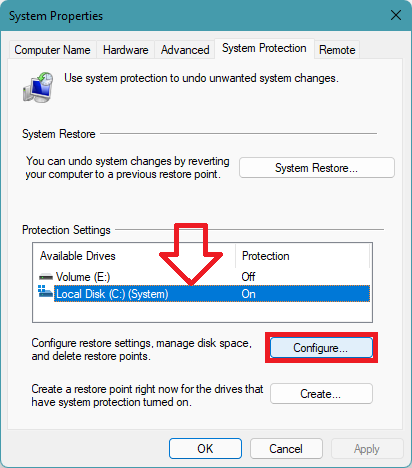
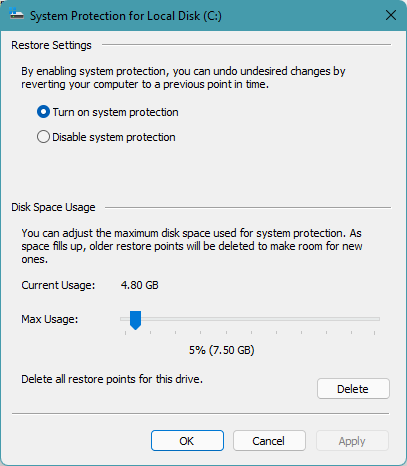
When running out on storage, deleting older restore points is a great idea to get some storage back. Microsoft has added the option to delete system restore points using the settings app. Follow the below steps to delete all system restore points in Windows 11. Step 1: First, open Settings on your Windows 11 PC. You can open settings by pressing the Windows + I key on the keyboard. Alternatively, you can open settings by searching for it in the Search. Step 2: After opening the Settings app, tap on System on the left sidebar. Step 3: Under System, scroll down to the About section and tap on it. Step 4: In the About section, scroll down to related links and click on System protection. Step 5: Clicking on System protection will open System properties in a new window. Step 6: In the System Protection tab, you will find Protection settings. All your available drives will be showing there. Select the storage drive on which you want to delete system restore points. After selecting the drive, tap on Configure button. Step 7: The system protection option for the selected Drive will now appear on the screen. There will be Restore settings; from there, you can enable or disable the system protection. Below that, you will find Disk space usage. It will be showing your current disk usage by the system restore points. There will be a “Delete all restore points for this drive” option with a Delete button. You can tap on the Delete button to delete all your system restore points. Step 8: If you don’t want to delete all restore points but only want to delete the older ones, use the slider next to the Max usage option to set the maximum disk space used for system protection and click on Apply. When the allocated disk space gets filled, the system will delete older restore points to make room for new ones. How do you delete System Restore points? One can delete System restore points from the System properties. Open the System Protection tab in the system properties, select the drive from which you want to delete the system restore points and Configure. Then tap on the Delete button next to Delete all restore points for this drive option. That’s how you can delete system restore points. How do I delete restore points in Windows 11? You can delete system restore points in Windows 11 using System properties. It allows users to delete all restore points of a drive to set a max disk usage, so system restore points don’t consume all the drive’s capacity.
Final Words
The system restore point is an excellent feature to backup the OS files and settings. However, it can take 10-15% of your storage drive. When in urgent need of storage, deleting older restore points comes very handy. Microsoft has made it easy for Windows 11 users by allowing them to delete system restore points right from the built-in settings app. I have provided the step-by-step process to delete system restore points above in the article. Go ahead follow the steps, and you will be able to delete older restore points on your Windows 11 PC.


